|
|
FrontBase Documentation |
|
|
|
FrontBase Documentation |
|
|
Backtrack: Welcome! 4. Administering a FrontBase Server 4.3. Adminstration Tools 4.3.1. FBManager |
Updated:
20-Nov-2000
prev — next Table of Contents |
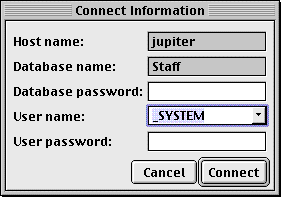
To enter the database management module, double-click on a running database in the monitor window. The following panel appears:
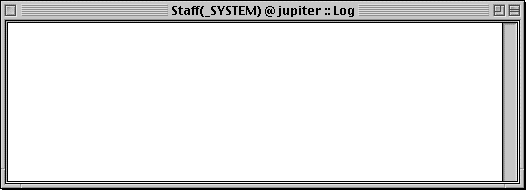
Enter the database password, if any, the user name and password, if any, and click on the "Connect" button. The user name is saved as a default and is automatically entered into the panel whenever appears. If a connection can be established, the following management window appears:
The window title has the format <database>(<user>)@<host>. A log window also appears:
SQL 92
The SQL92 management option is an easy to do "command-line" SQL-based interaction with the server. Any SQL statement can be entered in the text field and by pressing the escape key, the following happens:The SQL statement(s) are, if "seen" for the first time, inserted in the table view and send to the server for execution.The SQL statement(s) are appended to the log view.
The execution result, inclunding any error messages, are appendend to the log view.
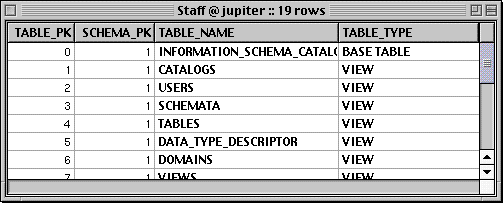
If the SQL statement is a SELECT, the corresponding table is fetched and displayed in a separate window.
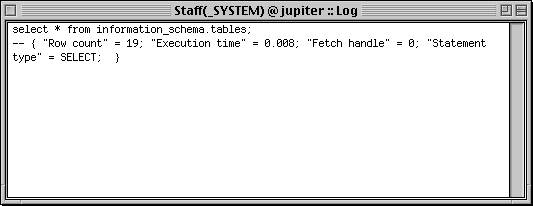
Example:
After having entered "select * from information_schema.tables;" in the textview of the management window and pressed the escape key, the management window, log window and the result window look as follows:By clicking on a row in the management window the corresponding statement(s), as previously entered, is inserted in the text field and can edited and executed again. By double-clicking on a row in the management window, the orresponding statement(s) is automatically executed again. Please examine the Management menu of the SQL92 page of the management window. It contains a menu item "Execute File...". If you click on this menu item a file browser is opened allowing you to select a file of SQL statements for execution as e.g. generated by Unload Database (see Management menu of the Database page).
Show plan
Check the box Show Plan next to the tableview on the SQL92 page and execute any select statement. The result window will now include not only the result of the fetch but also query plan information that can be used to decide whether indexes should be created for performance purposes.Auto Commit
Checking the Auto Commit box next to the tableview on the SQL92 page executes an SQL statement that switches Auto Commit on. This disables transactions. All following statements will perform permanent modificatons in the database that canG0t be rolled back. Check the box again to switch auto commit off and enable transactions again.Users
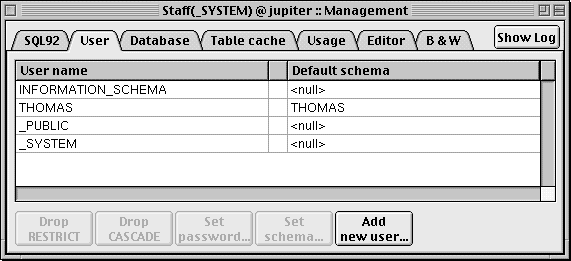
The user page is used to maintain the set of users:
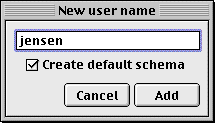
To add a new user click on the "Add new user..." button. The following panel appears:
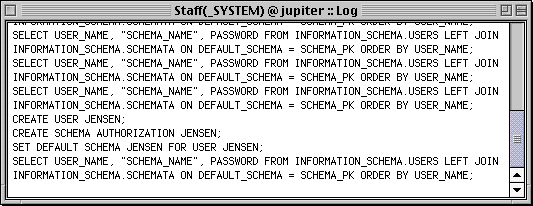
You need to be connected as user _SYSTEM to add new users. If the "Create default schema" switch is on, a schema with the same name as the user name is created. The corresponding SQL statements are shown in the log window:
To delete a user name, you first have to select it in the table view and then click on the "Drop RESTRICT" or "Drop CASCADE" buttons. Dropping restricted will only succeed if the user doesn't own any schemas. Dropping cascaded will unconditionally drop all schemas owned by the user.
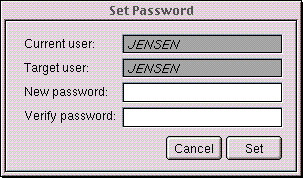
To set or change a password, select the user in the table view, click on the "Set password..." button and the following panel appears:
Enter the new password, verify the password, and click on the "Set" button. The user name table view is updated and now shows that a password has been set for the user:
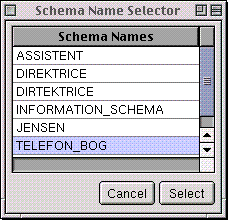
The default schema is the the schema that becomes the current schema for the user whenever a connection to the database is made. To set or change the deafult schema, click on the "Set schema..." button and the following panel appears:
Select a schema and click on the "Select" button, The user name table view is updated and now shows the new default schema for the user:
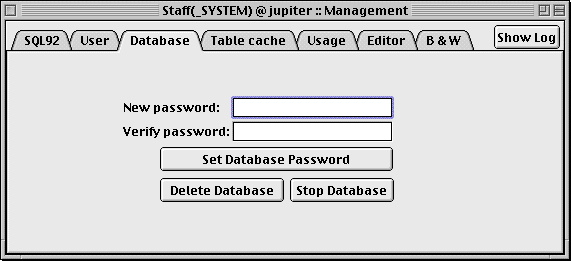
Database
The database page of the management window allows you to set a database password, and to stop or delete the database. These features are only enabled if you are logged in as _SYSTEM.
Enter the new password, verify the password, and click on the "Set Database Password" button. If you stop or delete the database, all concerned management windows will close automatically.
Please also examine the Management window of the Database page. It contains menu items for backing up and unloading databases.
BackUp
Backup Database initiates a backup of a live database. Once this operation has completed without errors, the backup is done and the corresponding fileB_<yymmdd>_<hhmmss>can be found in/Local/Library/FrontBase/Backups/<database name>. The backup will latch onto the newest possible version of the database. To make sure that a rollforward (in connection with a restore operation) including ongoing transactions can succeed, you should click Yes in the dialog that is raised after choosing Backup Database... from the menu.
Unload Database
Unload Database writes the proper SQL statements to recreate the entire database into a file calledschema.sql. This file will be created in the directory you specify in the dialog that gets raised when you choose Unload Database... from the menu. You can also specify whether the contents of all tables is to be written to flat files.
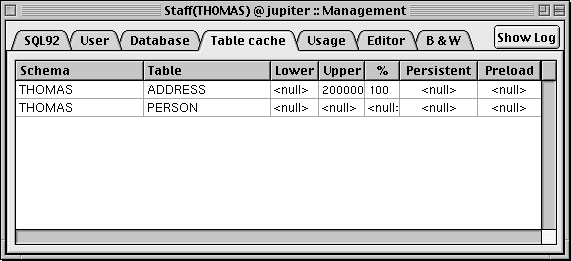
Table cache
This page can be used to finetune table caching.
All tables owned by the connected user are shown in the table view and the cache parameters for each table can be set. The parameters are:
Lower The minimum number of rows to be kept in the table cache. Upper The maximum number of rows to be kept in the table cache. % The percentage of total number of rows to be kept in table cache. Note that lower and upper take precedence over % if lower and upper are specified. Persistent If set to YES, the cache is kept across transactions, otherwise the cache is flushed after each COMMIT or ROLLBACK. Preload If set to YES, all rows in the table will be loaded into the cache when the server is started, otherwise the rows are loaded upon the first reference to them. Usage
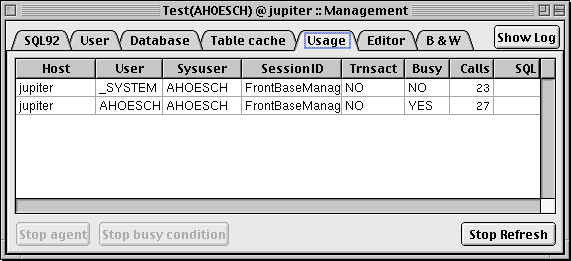
This page gives you some usage information for the monitored databases, who is logged in to what database, how many transactions have been performed since starting the database, etc.
Please also note the two buttons in the lower left corner that get enabled if you are logged in as _SYSTEM and click on a row in the tableview. These two buttons allow you to close a connection to the database or stop a lengthy operation. If for example an application initiated a time taking operation (complex select statement on a very large table) and you want to break this operation, just select the corresponding row in the tableview and click on Stop busy condition.
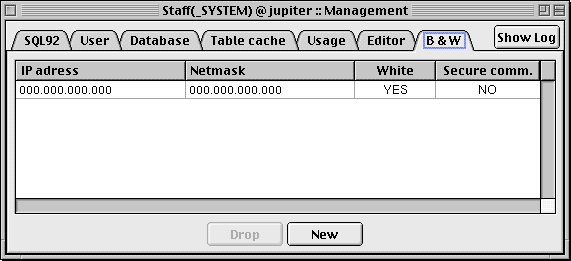
White/Black Lists
When a client connects to a FrontBase server, its IP address is checked against the white and black list to see if the client is allowed to connect. For each entry in the white and black list, the IP address of the client is ANDed with the netmask and the result is compared with the IP address in the white and black list. If a match is found and the White values is YES, the client is allowed to connect otherwise the connection is refused. If no match is found, the connection is refused. If a YES is entered in the secure field, the client is requested to uses encryption for all further communication with the server.
If you have feedback or questions on this document, please send e-mail to doc-feedback@frontbase.com. Please reference the section number and topic. Thanks!!
©2000 FrontBase, Inc. All rights reserved.